Problem Name: Is This Integration?
UVa ID: 10209
Keywords: geometry, math
I’ve been meaning to write about a geometry problem for a while now, because they generally provide interesting challenges that require some degree of creativity. With some types of problems, you can sometimes formulate your solution almost immediately after reading the problem statement. When you tackle a geometry–related problem, however, it’s rare that you can come up with a solution without doing at least some amount of mental work out first.
This problems asks us to consider a geometric figure built as follows: start with a square with sides of length \(a\). Now draw four arcs of radius \(a\) and angle \(\pi \div 2\), with their centers in each of the four corners of the square, and draw these arcs so they all lie inside the square. This produces a figure like this:

As you can see, the area of the square gets divided into 9 different sections of three different kinds, labeled here as \(X, Y, Z\). We’re asked to calculate the total area covered by these three types of sections —that is, the values \(X, 4Y, 4Z\).
Now, there’s probably many ways to get to the answer, but let’s try building our own, step by step. First of all, we can observe that we need to deduce the values of three unknowns (\(X\), \(Y\) and \(Z\)), so by simple algebraic reasoning, we can be sure that we need at least three independent equations to solve these unknowns.
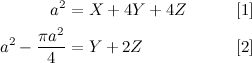
Let’s start with what is probably the easiest equation to derive from the figure: the total area of the square must be equal to the sum of the areas from all 9 sections:

This first equation is based on the area of the square, but we did not consider the arcs, so let’s do that for the second equation. Let’s consider the coloured area in the following figure:

We can observe here that the given section is equal to the area of the square minus the area of one quarter of a circle of radius \(a\):
It seems that we’re making good progress. We just need one more equation. However, at this point it’s easy to come up with something that looks new, but isn’t. For example, let’s say that we wanted to formulate a new equation for the area of the following section:

The problem is that, no matter how we look at it, the equation that we can derive from this is going to be basically the same as equation [2] above (try it!). If we analyse this for a moment, it shouldn’t be a surprise: we’re producing relations from the same elements (the square and the arcs). What we need is a completely new geometric element to use as a base for our last equation.
Let’s stop for a moment then, and take a look at our first figure, and ask ourselves: what other interesting (the word critical may come to mind) elements can we recognise in there? We have tried with the lines —either the straight lines from the square, or the curved lines from the arcs—, but what about the points? Maybe the intersection points can give us something useful. For example, let’s consider the following section of the figure:

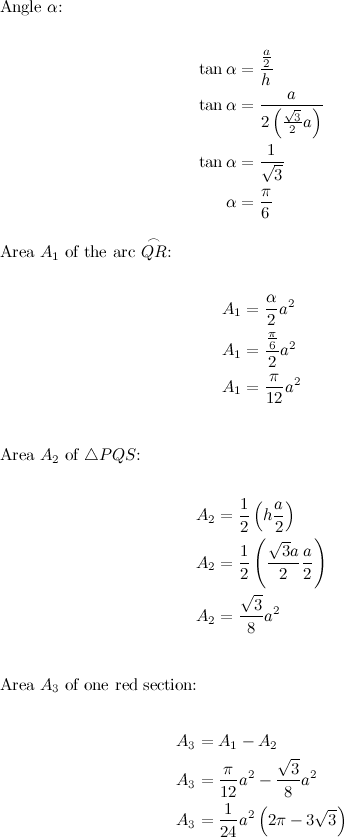
With some geometric reasoning, and a little algebra, we could derive a new equation to solve the value \(Z\). First of all, let’s find the height \(h\) at which the two relevant arcs intersect and which marks one of the sides of the coloured rectangle from the last figure.
Starting from the standard equation of a circle with radius \(a\), and given that the symmetry shows that the intersection point happens horizontally right in the middle of the square, we can deduce \(h\) like this:

Now, if we knew the area covered by the red sections, then the value of \(Z\) could be easily deduced. So let’s see what else we can find out from our last figure:

We can observe now that the one of the red sections has an area equal to the area of the arc \(\stackrel\frown{QR}\) minus the area of \(\triangle PQS\). And we can calculate these areas by knowing the angle \(\alpha\) and the sides of the triangle \(\triangle PQS\) which are \(h\) and \(a \div 2\):
With all of this, we can finally summarise our findings with the three equation we were looking for:

The corroboration of equation [3] and deducing the final values of \(X\), \(4Y\) and \(4Z\) is left as an exercise to the reader :). Also, try perhaps looking for a simpler way to deduce all of these values. As I said before, there’s usually more than one way to do it, and some can be simpler than others. By simply staring at the original figure for a little while, an interesting idea may pop up in your head that helps you solve this in a way that you find easier to understand. And you’ll never know unless you try :).
No comments:
Post a Comment